
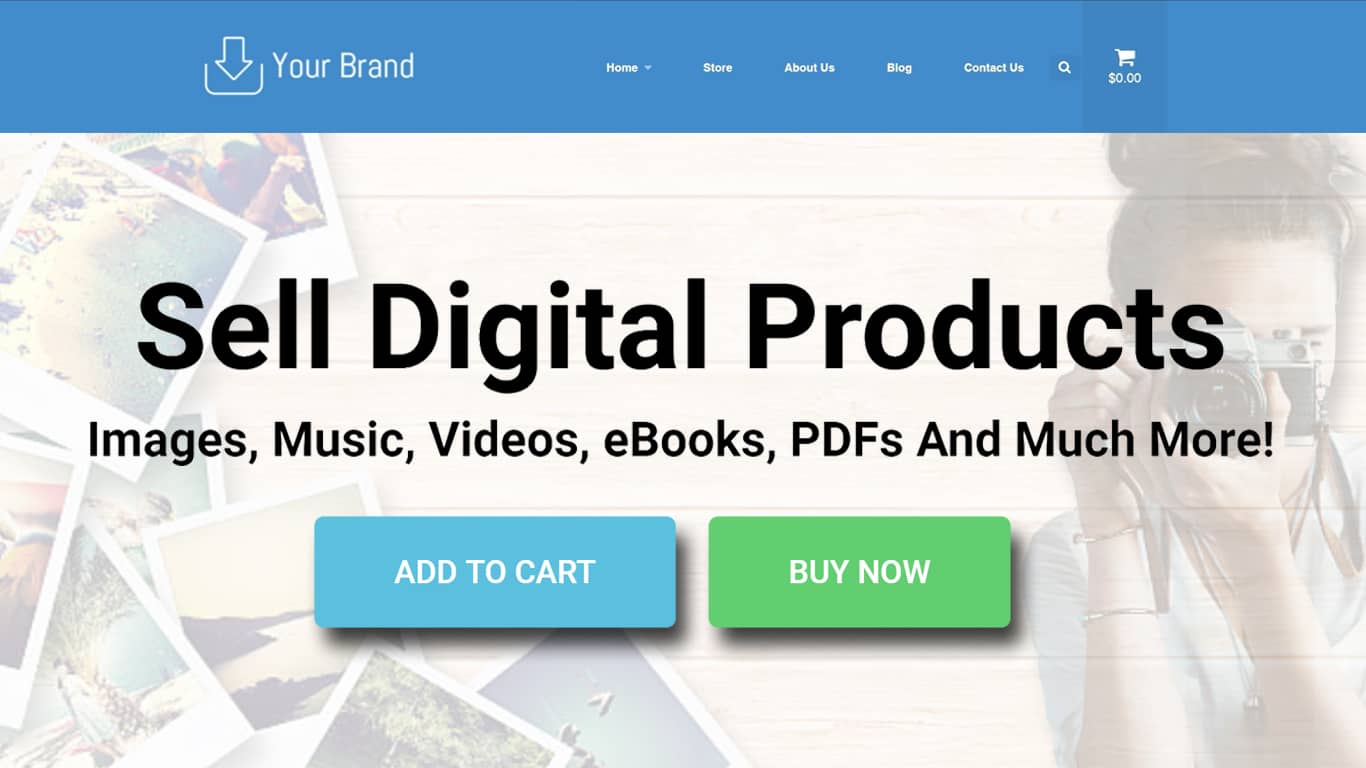
In today’s world, digital products generate multi-million dollars of sales per year. If you have a digital product that you create or an idea for a digital product that you would like to create, you will have to make a website in order to have a piece of that cake.
Creating your own website for your digital goods is easy than ever before. The great things about digital downloads are that the maintenance costs are minimal. No stock, no storage, no merchandise, no employes or physical address. Just create the product once and sell it to the world.
This blog post is perfect for anyone who sells digital products such:
- PDFs
- Photographers selling their own photos
- Music files (such as MP3 and Wav)
- Photoshop designs and mockups
- Softwares
- Video files (such as AVI and MOV)
- Music lesson websites
- Band/Artist websites (VIP content)
- Selling eBooks or audiobooks
- Selling sheet music, quilting instructions/templates, PDFs, etc.
- 3D Designs
- Courses
- MANY MORE
How Much Will It Cost Me?
Way less than what you think! While a web developer will charge you few thousand for an alright design, you will be able to create your dream design with less than couple hundred dollars. YES! That is right!
Website For Digital Downloads – What Included?
I’m glad you’ve asked, so here are only some of the elements that we will cover in this post:
- Register a domain name.
- Sign up with hosting company (Hostgator).
- Install WordPress (CMS).
- Install Theme.
- Create a child theme.
- Install Plugins.
- Customize the website layout.
- Create a logo.
- Design the home page.
- Create Downloads.
- Create Contact us page and about us page.
- Store page (to display all products).
- Product page.
- Cart
- Much more.
So without further ado, let’s start right away.
Register A Domain Name And Hosting
Registering a domain name is the first step in this process. How would you like to call your website?
When looking for a domain name, you’ll find that many of the options are already taken. In this case, you’ll need to keep trying with a longer tail word. When I created the video at the bottom, I was looking for the domain ‘digitalshops.com’, because it was already taken, I just added ‘my’ and then I registered the ‘mydigitalshops.com’ domain.
You may need to do the same, think out of the box and you’ll find your domain eventually.
Ok, so I am using Hostgator as my preferred company to register the domain name and hosting. I use them for years already and I recommend you to do the same. They are very good and they have a great customer service.
In the Hostgator screen, choose the ‘Baby’ or the ‘Business’ plans. If you would like to charge customers with credit/debit cards, do not choose the ‘hatchling’ plan.
If you already own your domain, choose the ‘I Already Own This Domain’.
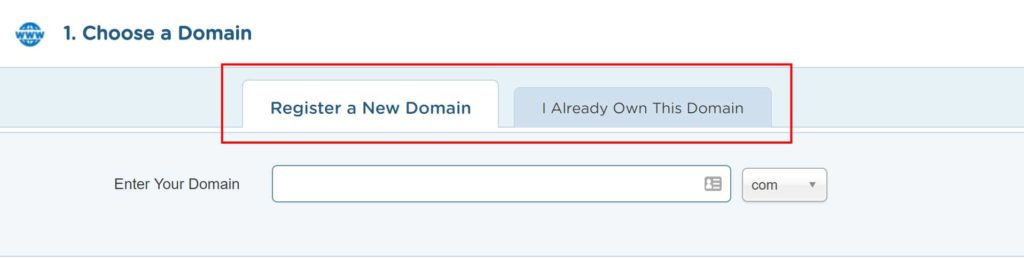
If you are looking to buy a domain, stay on the left tab, and enter your domain in the search bar under the tab.
If your domain is available, scroll down.
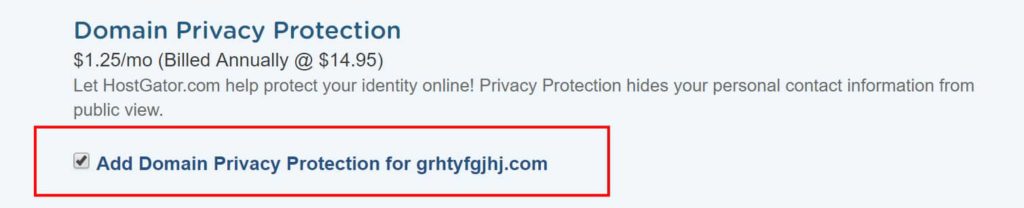
I recommend you to uncheck the ‘Domain Privacy Protection’ box to reduce the cost. I don’t think it’s necessary. You can also add it later if you need it.
In the second section, validate that the plan you chose in the previous screen is the same one as in the ‘Package Type’. In the ‘Billing Cycle’, you can choose for how long you would like to host your website. The longer the plan, the cheaper it gets. Nevertheless, I have an amazing coupon that I will share with you in a bit to reduce the prices of the domain and the hosting (any plan and billing cycle).
In the third section, enter your billing information. You can pay with a credit card or PayPal.
In the fourth section, feel free to uncheck all the add-ons. We don’t need them right now, and we would like to keep it cheap as possible. Down the road, if we would like to add them, we can.
In the fifth section, the coupon code section, we will use the WPBESTOFFER discount code. This coupon code will give you amazing discounts on every package and billing cycle.
If you choose the one month plan it will give you the first month for only 1 PENNY! Yes, 1 PENNY!
If you choose any other plan, you’ll get between 40%-60% off on your total cost!
In both cases, it will also reduce the price of the domain registration cost.
PLUS, I will reward you nicely for using this code. The reward will make your site better which will generate more sales and revenue.
Go through the checkout process and wait for an email from Hostgator.
Install WordPress – The Best Content Management System
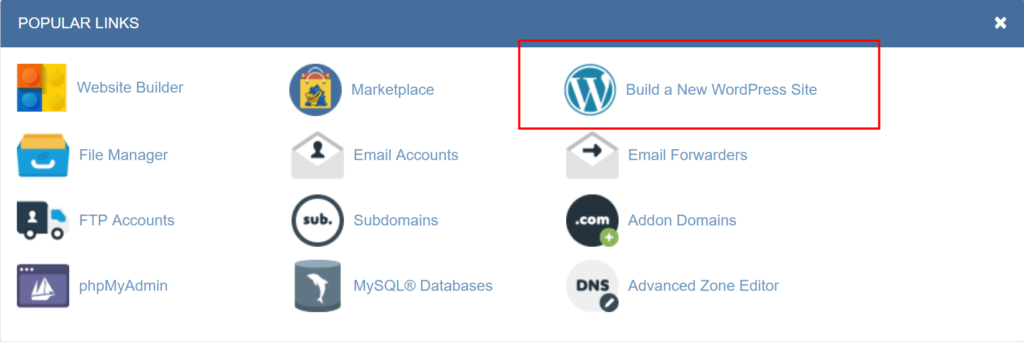
After checking out, log in to your Hostgator dashboard using your credentials from the email they sent you.
Inside the Dashboard, click on ‘Build A New WordPress Site’.
In the next screen, you’ll need to fill a blog title (you can change it later on so don’t worry), along with admin name, admin email, name and last name. Then, click ‘Install’.
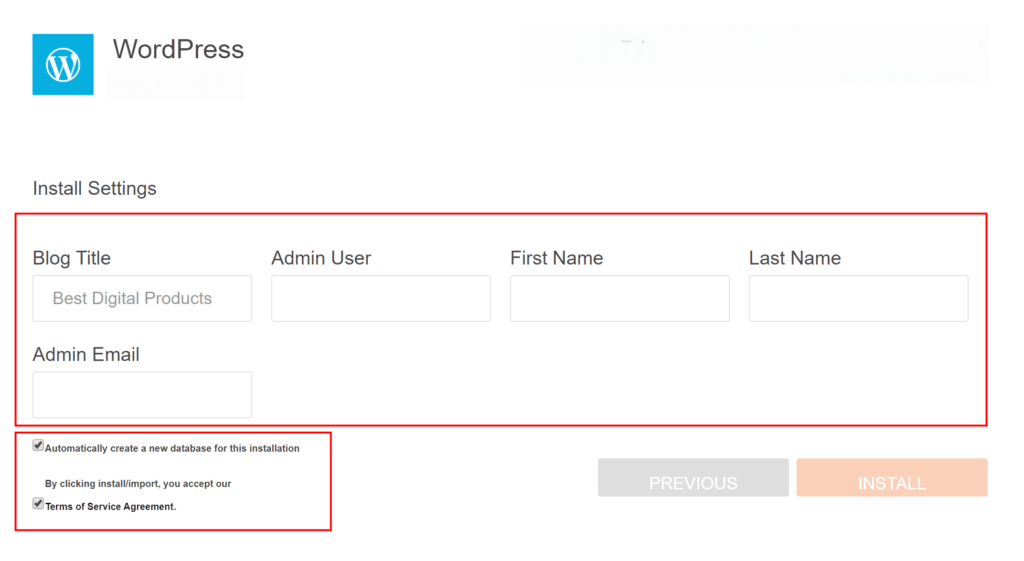
The installation process will take no more than few minutes. After that, you’ll get your credentials (username and password) with a link to your website. In order to log in to the back end of your website, add /wp-admin to the right of your URL. Example: yourwebsitename.com/wp-admin
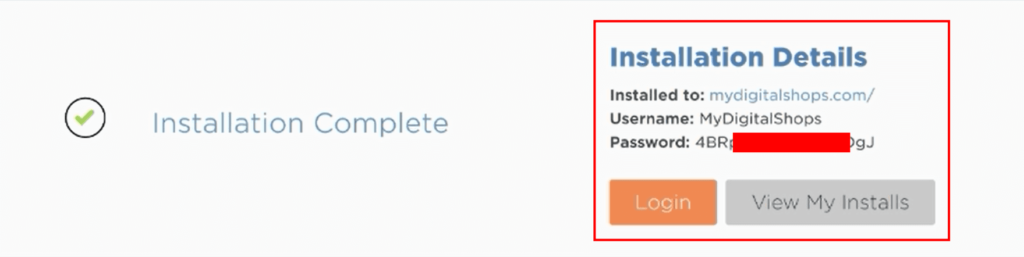
Congrats! You registered a domain name, you signed up with a hosting company and you’ve installed WordPress. Way to go! Let keep forward.
Install The Right WordPress Plugins
In order to sell our digital products and design our site the way we want, we will have to install the right plugins. Because we would like to keep our site fast, it’s better to delete all the plugins that we don’t need first.
Go to ‘Plugins’ on the left menu, and check all the plugins that came pre-installed with your website. Then deactivate and delete them.
Here are all the plugins that we need to install:
- Elementor Page Builder
- Easy Digital Downloads
- Child Themify
- Page Templater For Elementor
After installing them, activate them.
Install The Vendd Theme By Easy Digital Downloads
Easy Digital Downloads (or EDD) is the plugin that we will use to sell our digital downloads. Even tho that you can use any theme you’ll like, I highly recommend you to use the Vendd theme because it was developed by the same EDD programmer, and that makes it the best option for this purpose.
First, download the Vendd theme.
Now, inside the WordPress screen, go to ‘Appearance’ -> ‘Themes’. Click on ‘Add New’ at the top, upload the Vendd theme and activate it.
After that, go back to the Themes page, click on the Vendd theme, and click on ‘create a child theme’ at the bottom right.
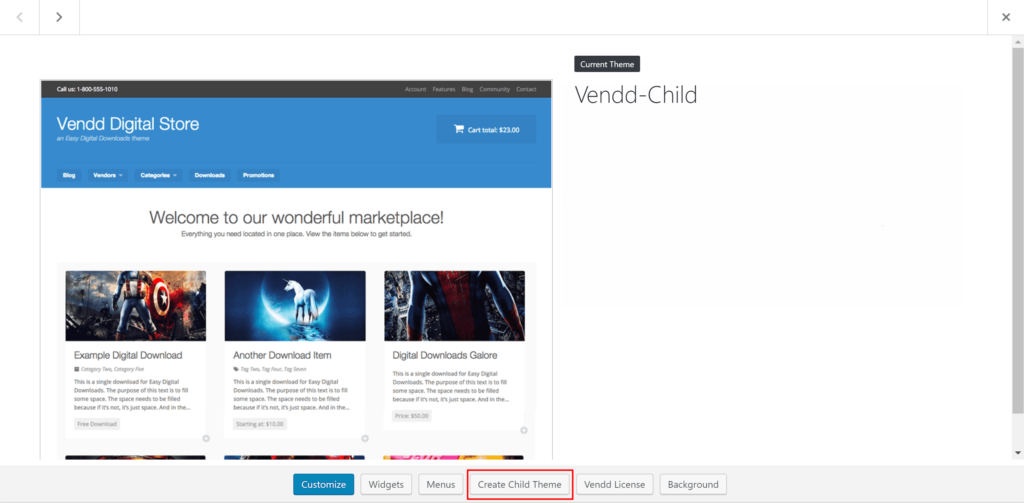
In the next screen, name the theme ‘vendd-child’ and click create. After that, activate the new Vendd child theme.
Create Pages And Blog Posts
Every website is made with pages. Your website too. In order to create a new page hover on the ‘Pages’ option on the left and click on ‘Add New’.
First, name the page ‘Home’ and set feature image (optional) choose your template on the right.
Default Template – Header (top), Footer (bottom), Content (left), Sidebar (right).
Elementor Full Width Standart – Header (top), Footer (bottom), Content (in the middle between the header and footer).
Elementor Full Width Blank – Only content.
In this case, we will use the Elementor Full Width Standart template. Choose the template and click ‘Publish’.
Now, create three more pages and name them ‘About Us’, ‘Contact Us’ and ‘Blog’. Leave the Blog template as default.
Creating blog posts is an identical process like creating pages. Click on the ‘Add New’ option under the ‘Posts’ on the left. Name your post, keep the default template, and set ‘Categories’, ‘Tags’ and ‘Featured Image’ from the right sidebar.
Categories and Tabs will organize your posts archive in a much better way. It will also help your customers to view posts from specific category. For example, if you write a post about snowboard, name the category ‘Snowboard’. If you write about ski, set it to a different category such as ‘Ski’.
That way, when your customer clicks on the category name from the breadcrumb, he will see all the posts from that specific category.

WordPress Settings
WordPress is a very good platform to build your site, but we can make it even better. To do so, we need to adjust some of our settings.
On the left menu go to Settings -> General. In the general screen, you can change the site title and tagline. You can also add the ‘www.’ before your URL (it’s optional). Scroll down and save the changes. It will log you out, re-enter your password and log in again.
Now, go to Settings -> Reading and set the front page to home and the posts page to blog. Scroll down and save the changes.

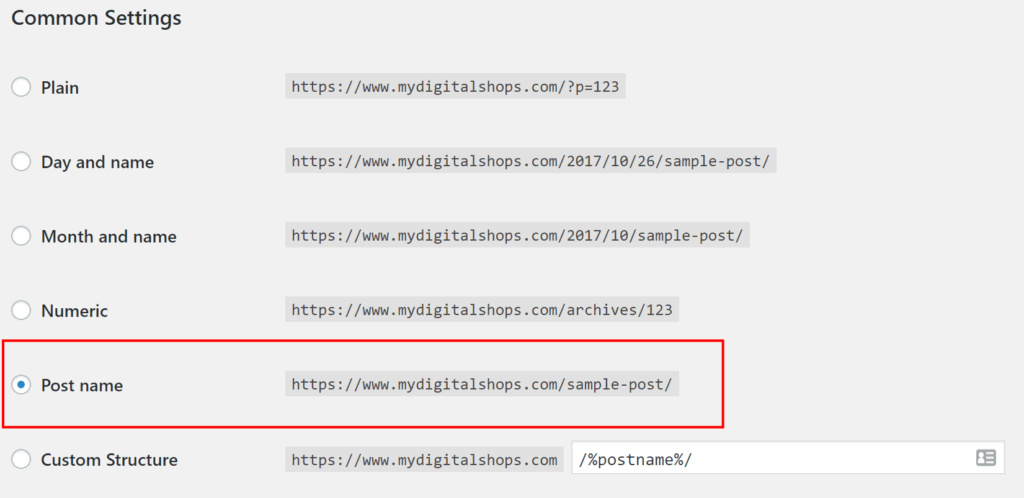
Now, go to Settings -> Permalinks and change it to ‘Post name’. Scroll down and save the changes.
WordPress Customization
Visit your homepage and click on ‘Customize’ from the top menu.
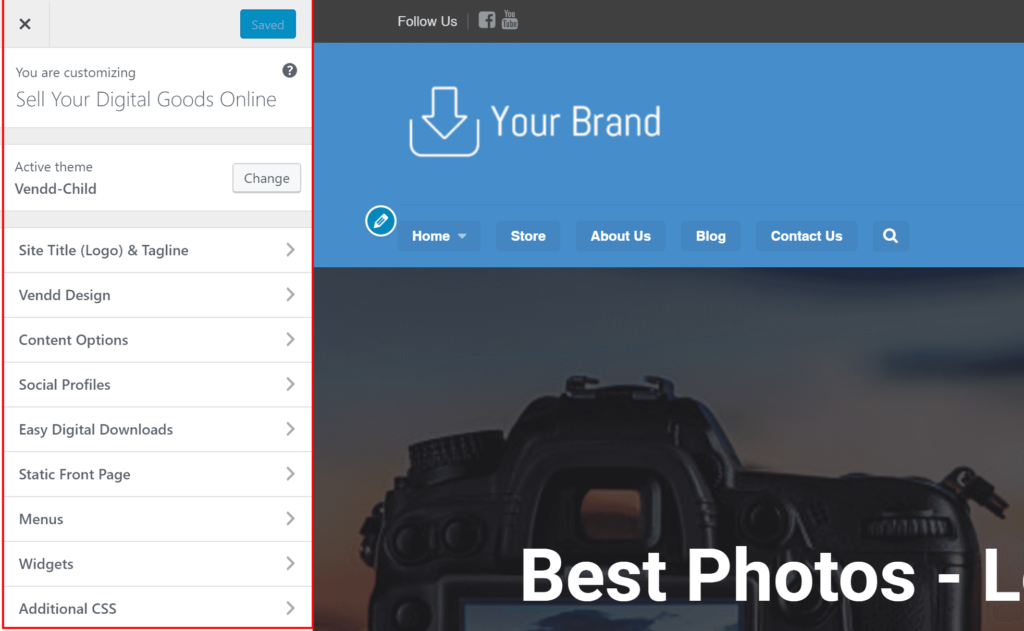
Site Title & Tagline – Here you can change the title and the tagline. You can also add logo and favicon. If you don’t have a logo yet, you can create one here by yourself or use one of many logo makers from fiverr.
Vendd Design – Here you can change the colors of your website’s body, the color background and even set a background image.
Content Options – Decide whether or not to display the featured image of the post/page inside the post/page itself. You can also add a search option to the main menu and also change the text of the top bar and the footer.
Social Profiles – Fill your socials links and decide if to show the socials icons in the top bar.
Easy Digital Downloads – Decide if to show featured images on products (recommended unless you sell images). Set default image for products (will only show if you did not set a featured image). You can also decide if to allow comments on digital products and can also change the EDD button color and change the text or title of the EDD templates.
Menu – Add new menu, name it and add the desired pages to the menu. Also, create a custom link called ‘Store’ and set the url to yourwebsitename.com/downloads. After you did so, set the new menu location to ‘Main Menu’.
Additional CSS – Copy the CSS code below and paste it in the ‘Additional CSS’ box.
.page-template-builder-fullwidth-std #content {
padding: 0;
}
.page-template-builder-fullwidth-std .site-content .page-inner {
max-width: 100%;
}
.site-footer {
background-color: #3d3d3d;
padding: 40px;
}
.vendd-full-width-html-structure .site-footer .page-inner {
border-top: 0;
}
Easy Digital Downloads Settings
On the left menu, hover on ‘Downloads’ -> ‘Settings’.
Many stores have a different kind of settings but there are many settings that are similar to most of the EDD digital stores.
Let’s go through the settings that will most likely fit your store and some settings that you may need to change.
General
General tab – Leave the default pages as they are. Change the store location to where the store is located.
Currency tab – If you set your location to outside of the USA (Europe for example), consider changing the currency from dollars to euros.
Payment Gateway
General tab – Check your preferred payment method like PayPal or Amazon, and also check to display the card icons at the cart. Later on, I will show you how to add a gateway to charge cards.
PayPal tab – Enter your PayPal email address to where you’ll like to get paid.
General tab – Enter your ‘from name’ and ‘from email’. It’s pretty self-explanatory.
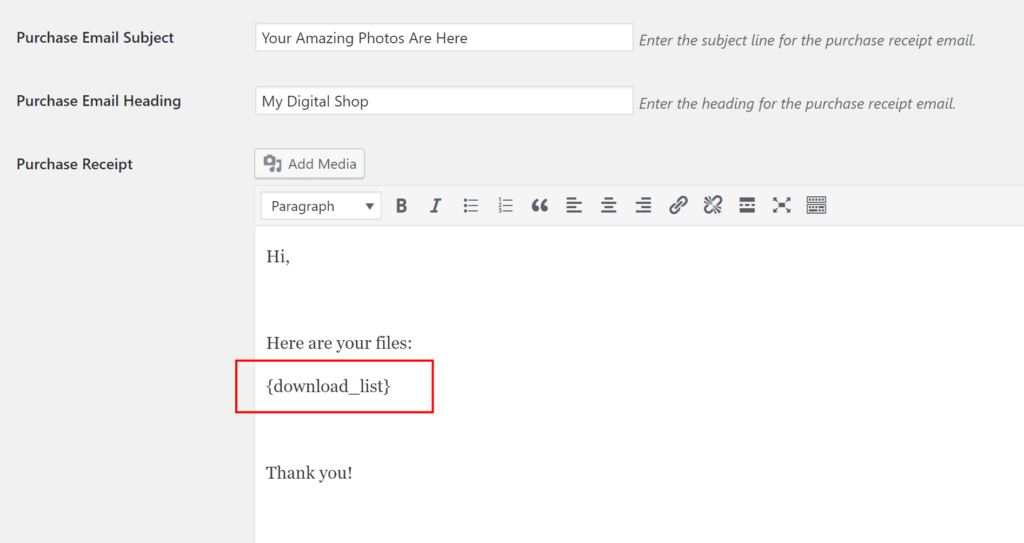
Purchase receipt tab – Create a template receipt that will be sent to customers after successful purchase. Make sure to include the {download_list} inside.
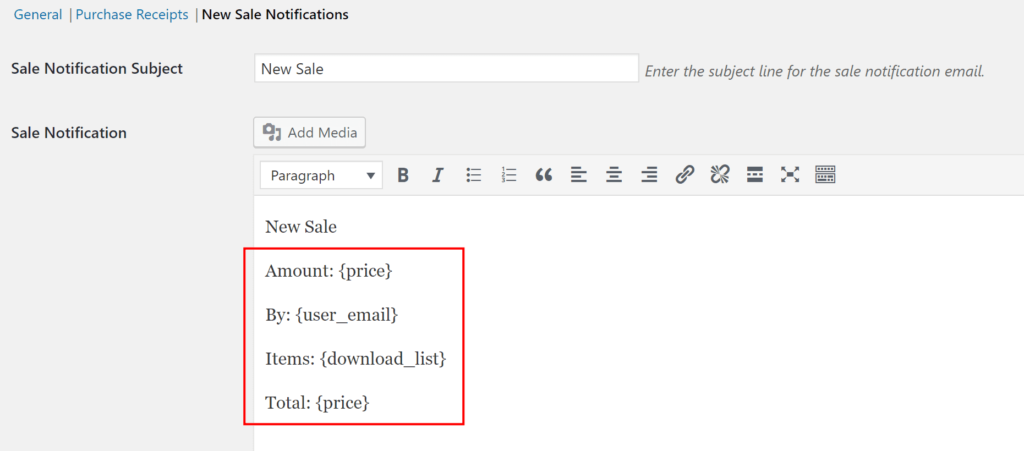
New Sale Notification tab – This is the message that you (Admin) will get for every successful purchase. I created something like that for myself.
Style And Taxes
In the style tab, you can change the colors of the purchase button and the text of the button.
In the taxes tab, you can set the tax amount that will be added to the products on the cart page. In most countries/states you don’t need to add taxes on digital products but it’s up to you to check the taxes requirement in your country/state.
Misc
Most of the misc setting does not need to be changed. The only things that I changed in my store are:
Check out tab – I changed the ‘Show register form’ to ‘None’.
File Downloads tab – I changed the ‘Download Method’ to ‘Forced’ and the ‘Download Link Expiration’ to 72 hours.
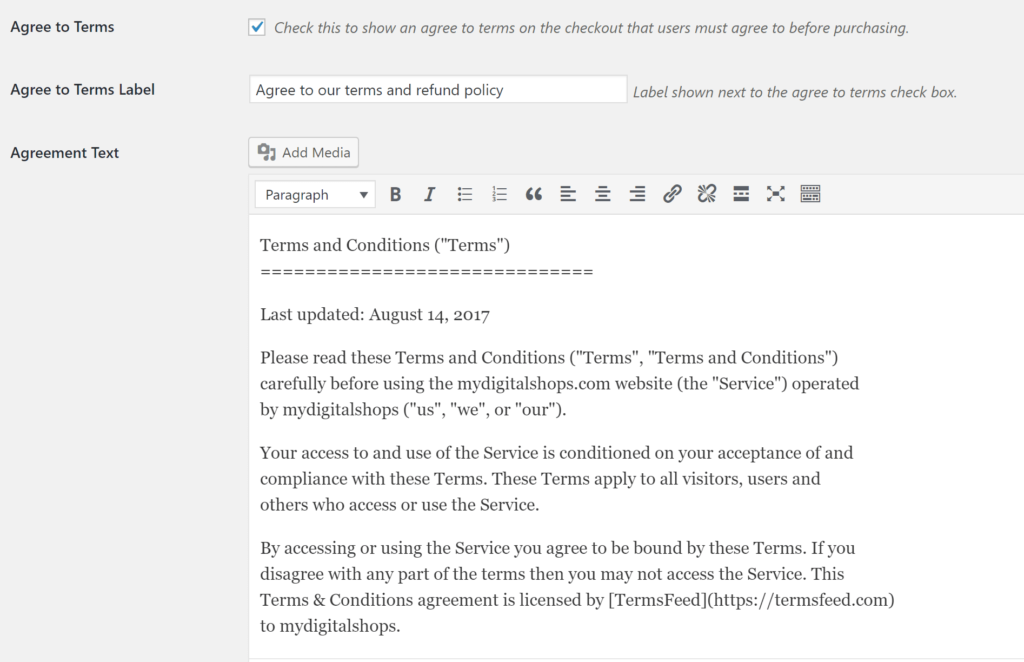
Terms Of Agreement tab – I checked the box ‘Check this to show an agree to terms on the checkout that users must agree to before purchasing’. I wrote ‘Agree to our terms and refund policy’ for the box label and also pasted terms and conditions text that I generated here.
It is very important to for the customers to agree to the terms before they download our files. You MUST legally protect yourself and your business.
Create And Add New Downloads Or Digital Products
Adding a new download is very a similar process like creating a new page or a post.
Go to ‘Downloads’ -> ‘Add new’. In the new download page, write the product title and description.
Under the description box, you can set the price for the product. If you have variable options for this product, you can set a different price to each of the versions.
For example, if you sell images and you have two versions of that specific image, you can price them differently. Standard Definition – $3 and High Definition – $10.
Under the Download Files section, you can choose the file that the customers will receive after successful purchase.
In the Download Notes, you can enter special notes or instructions for this product. These notes will be added to the purchase receipt.
In the Excerpt box, write a short description regarding the product. This excerpt will be displayed under the product image in the /download page.
In the right sidebar, set the category and the tags for the download. You also have the option to limit the number of times that the file can be downloaded.
Set the featured image for the download and publish the download.
Design The Pages With Elementor Page Builder
The video below will describe in details how to create sections, background, call to action buttons and etc.
In this writing post, I’ll teach you the basics of how Elementor the page builder is working so you’ll be able to create any section you’ll like.
On the left side, you’ll find the widgets sidebar. On the right part of the screen, you’ll find the page itself. Now, drag the desired widget from the left to the right.
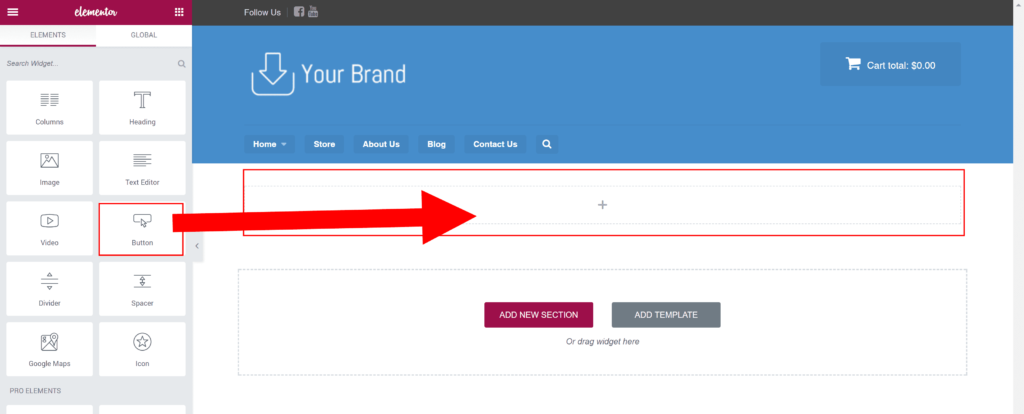
After dragging the element to the right, you will see that a new menu was opened up on the left instead of the widgets sidebar.
Every widget comes with that menu on the left, and there are three tabs to edit and control the widget. The three tabs are ‘Content’, ‘Style’, and ‘Advanced’.
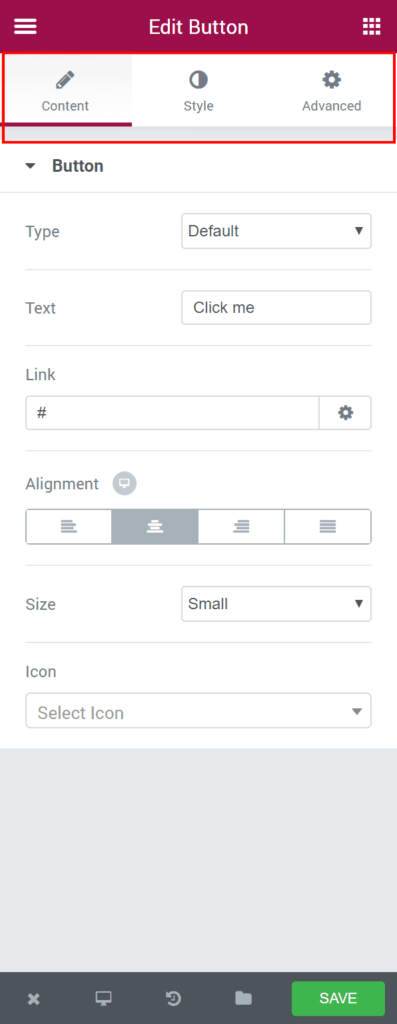
In most of the widgets, the options in the three tabs are similar. The ‘Content’ tab will be in charge for the content. You can change the text, link the element or change the alignment of the element. The ‘Style’ tab will let you customize the colors, the background, font size, weight, line height and much more. The ‘Advanced’ tab will control the margin, padding, entrance animation, mobile view and extra options for background and border.
Feel free to drag many elements as you wish to the right side. Design them, play with them and let your imagination go. If you don’t like it, delete them and start over again.
Install An SSL Certificate
In order to charge customers with credit or debit cards, we have to secure the connection between our website and the payments process company.
SSL certificate doing exactly that. When you visit a website with an SSL certificate, you’ll see a green padlock at the top left next to the website URL. You will also see that it’s HTTPS instead of the regular HTTP. The S means secure.

There are many certificates that will fit your needs. You can see a list of them in the SSL store.
Installing the SSL certificate for your Hostgator website is fairly easy. Please follow these steps:
- Fill this form to generate Certificate Signing Request (you’ll need it to purchase the SSL certificate).
- Visit the SSL store and choose a certificate. Add the desired certificate to the cart, and go through the checkout process. Any of them will match your needs. You can also upgrade later on if you want.
- After a successful checkout, the SSL store will send you an email with your SSL Certificate number along with other keys such as CA Certificate and RSA PRIVATE KEY. You don’t really need to know what they are, just look for them in your email.
- In the last step, fill out the ‘Install SSL‘ form on the Hostgator website and pay the installation fee.
- That’s it! your website is secure now and you should see the green padlock.
For extra details regarding this process, please visit the Hostgator website.
Connect Easy Digital Downloads With Payments Process Service
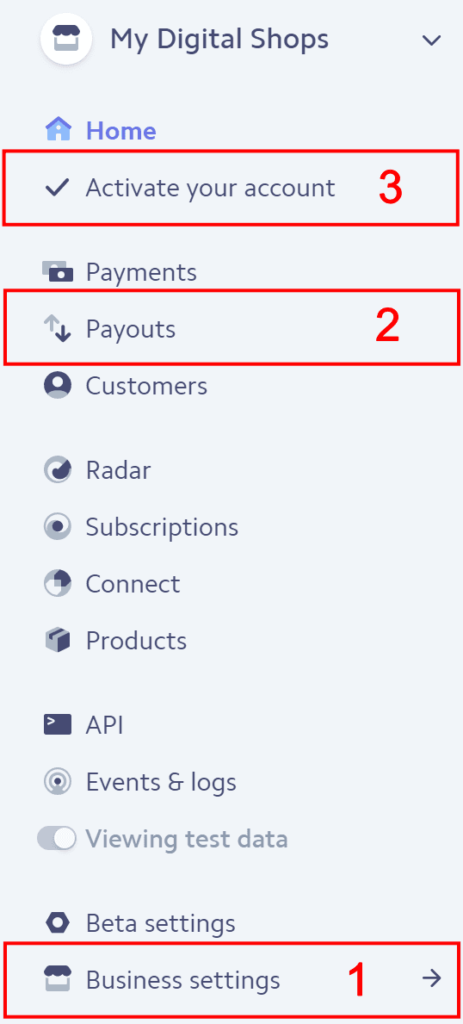
In order to charge cards, we need to register with a service to process the payments. Stripe is the most popular payments process company for that.
- Visit Stripe and create a new account.
- Inside the Stripe dashboard, verify your account from the Business Settings tab on the bottom left.
- Connect your bank account to Stripe from the left Payout tab -> Settings -> Add bank account.
- After verifying your account, activate it from the ‘activate your account’ tab from the left top corner.
Connect Easy Digital Downloads With Stripe
In order to connect our EDD store with Stripe, we will need to get a plugin that does exactly that.
Download and install the EDD Stripe Gateway plugin into your WordPress website by going to Plugins -> Add new -> Upload plugin (at the top).
After installing and activating the plugin go to Downloads -> Settings -> Licenses and enter the license key (you can find it in the purchase receipt from EDD).
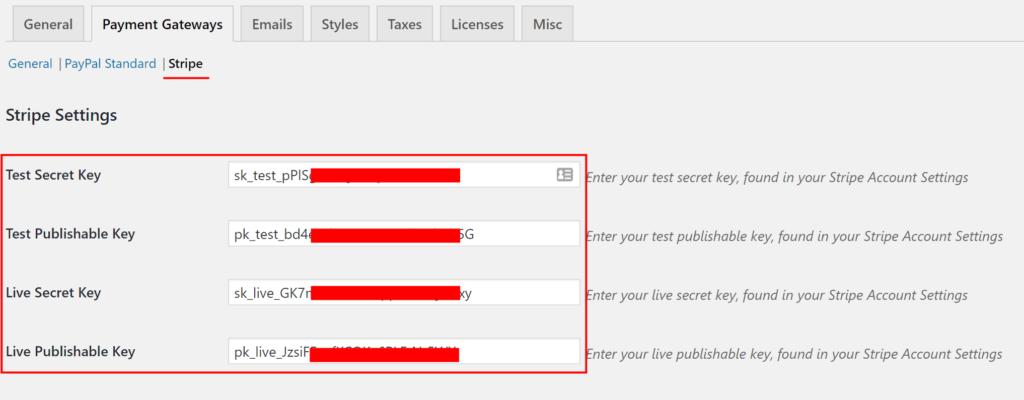
Now, go to Downloads -> Settings -> Payment Gateways and check the Stripe box to enable it.
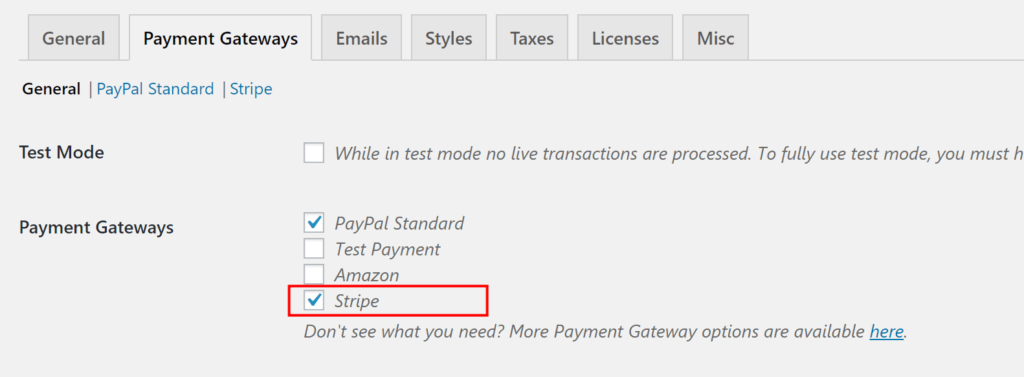
You’ll see that now you have a Stripe sub-tab under the Payment Gateway tab. Click on it and enter your test keys and your live keys. You can find the keys in the Stripe dashboard inside the API tab (if you only see the test keys, activate your Stripe account and you’ll see the like keys as well).
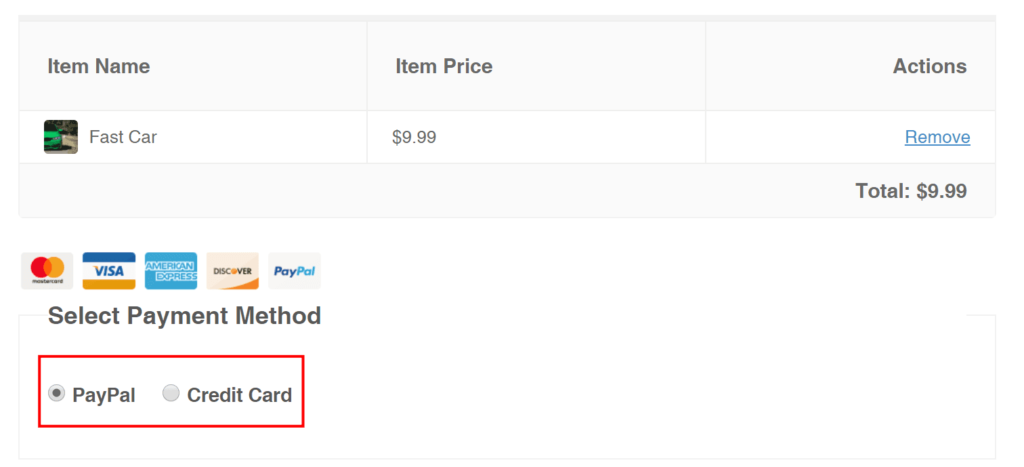
After you connected your Easy Digital Downloads store with Stripe, add one of your items to the cart and visit the checkout page. You will see the ‘credit card’ option next to the other payments gateways options.
Conclusion
Your store is up and running, that is great! But there are so much more you can do with the Easy Digital Downloads plugin. You can create discount codes for promotions and even use the EDD shortcodes to implant products in any page or blog post. I explain and show all of that and more in the video tutorial below. There are also so much more EDD add-ons that will elevate your store and help you generate more money from your digital products. Because I couldn’t cover them all in this video, I will add many of them in my Udemy course. If you have any special request of any of the add-ons please leave me a comment down below. Please feel free to contact me with any question by leaving a comment here or filling the contact form on the ‘Contact Us’ page from the main menu.

Hi, i have been following this your video to setup a small digital website for myself and i stopped at the the point where you gave conditions on how to change the header size and i have no means of buying a domain from hostgator now.Please could you tell me how i could change the size of the header so that i can move forward with the tutorial?
איך אפשר לתקשר איתך?
Hi, i saw your vídeo and i want to buy elementor with discount. Wich is your discount code? Can i do it using your link?
Tks
Awesome post! Keep up the great work! 🙂